

Steps in Building a SCAMP sailboat
Links to all my scamp building pages.
Under Cockpit and Watertight Compartments including seats, and Ballast Tank
For some reason I would really like to have the first hull planks installed. I think it would make me feel like I'm progressing faster. I've been working on centerboard pivots and ballast filling hole. Detailed and useful work but there is not much to show for the hours of work.
It would be better to have the work on the watertight compartments done and ready to close up before putting planks up. They are easier to reach this way. So patience eh!
Floor Supports


The cockpit floor lies over the bulkheads and is supported by strips of woods that reinforce the bulkheads, and also are glued to the side of the seat uprights.
After fitting the strips I coated them with epoxy. I need to be particularly careful with the strips that are located in the water ballast tank. They need to be well waterproofed.
Glued them in. I have strips of flexible plywood to push the side strips in place while the glue sets.
I have to decide if I want large openings to the watertight compartments under the floor. I'm tempted to keep these opening quite small, 6-7 inch round covers. This boat is likely to be more of a day sailer than an expedition boat. I will be having larger openings to the side and the front compartments.
The small round ports are inexpensive and are easy to install too.


I spent some quality time with my sander today. After finishing to glue on the support struts I spent the day sanding.
I also added a few fillets and touched up in a couple of spots. The inside got a final coat of epoxy. That's 3 coats for most of the inside bits except for the struts which only have 2. I mixed more epoxy than I could use in 20 minutes so I kept some on ice to slow down the setting.

I cut and installed the back floor support. On each side of the central compartment there are small bilges. This is where any water that splashes in or comes in through the mast, ends up. There will be small drainage ditches on either side of the cockpit floor.
I don't think I will do much more to the interior compartments. Once the epoxy is sort of smooth and does not snag onto stuff put into the compartments I think that is smooth enough for me. I will save my sanding urges for the exterior and visible parts of the boat. I will be painting the inside of the compartments white. It makes them brighter and easier to use. The water ballast tank will get a bit more work and certainly a coat of paint.

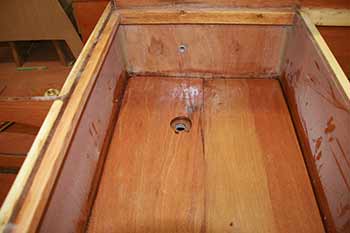
I found this Garboard drain plug in Canadian Tire. It is readily available on Amazon.Sea Dog 520040-1 Garboard Drain & Plug It's a brass screw in plug and a threaded fitting to install it. It requires a one inch hole. There are many nice through fittings available but mostly they are thicker than the bottom ply or quite pricey.
This will need some kind of wrench. It screws in quite nicely by hand right now, but I can imagine a bit of silt getting in there and making the screw less smooth.


There is something very scary about making a big hole in the bottom of a boat.
The plug requires a plywood doubler. Here is a dry run.
Some modifications of the ballast tank
At this point both John Welsford and Howard Rice, Designer and Builder /Adventurer, wrote on my facebook page to suggest strongly that some modifications would be useful

Because in a few boats there has been a small seepage of of water out of the tank into the boat, John suggested taping the seams to improve the seal. I did this by making larger fillets on the bottom and side seams and also adding fillets under the floor support sticks. I then taped the seams.

Howard suggested adding some plywood to the floor to make the floor higher so that the plug would drain all the water in the tank. As shown in the plans, the drain stands about half an inch proud of the floor and cannot drain the last bit of water on its own. I had at that point glued in the doubler.
It seemed like a good suggestion so I added some ply to the bottom of the water tank till it stood just a bit higher than the plug. This will allow the water to drain completely at the cost of some extra weight.
Both John and Howard made a point of emphasizing that the cockpit floor had to very well glued down with lots of epoxy glue to make sure the tank was waterproof around the top edge.
I also added a small extra floor support to make the top of the tank seam thicker. Plans only ask for one but the seam of the 2 piece bottom of the cockpit floor falls just at the bulkhead and I'm not confident that I will be able to glue the 2 parts of the bottom floor perfectly evenly and flat. This way will give me good gluing surfaces.

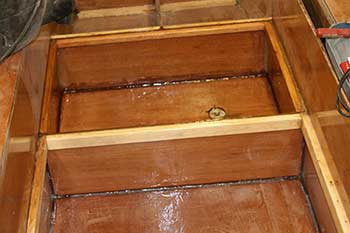
The ballast tank has been sanded and a final coat of epoxy applied. It is bombproof and will be waterproof, or else.
I get the floor pieces ready

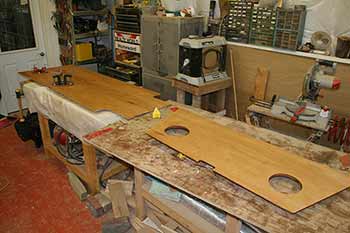
Back to making holes and backing frames for the floor hatches, gluing them in position and sanding and epoxy over everything.
I have 10 hatches in total. 2 large ones in the upright bulkhead that give access to the large front compartment, 2 small ones at the very back that vent out the small airtight compartments, 2 larger rectangular openings that fit on the seats and 4 floor hatches.
I dry fit the lower floor pieces. The completed floor is made up of 2 layers. The bottom layer is in 2 pieces which join together at the front of the water tank. The second layer, is in one piece. The second layer of the floor is smaller and this creates a drainage canal on the side of the floor.
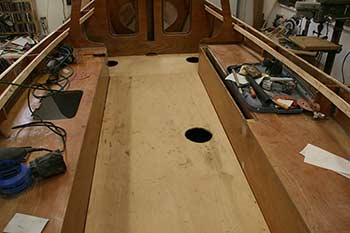

I also had to decide where I wanted the floor hatches to be positioned. In the end I decided on 2 in the front cuddy compartment and 2 in the cockpit floor area. One to access the middle compartment and one to access the filling hole and the centreboard pivot pin.
I'm not really intending this boat for a lot of travelling so the access to the hatches is somewhat limited. I guess if I decide that I need more hatches I can add some later. The advantage of fewer hatches is that if I go over there is less of a chance of the hatches leaking.

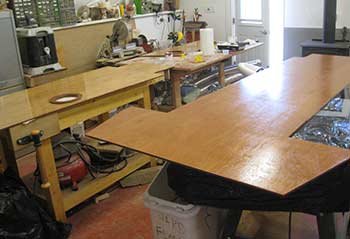
The top section of the floor gets a coat of epoxy. It will need to be fine tuned and dry fitted. I will round the sharp corners and also round the edges. I'll do that after I've glued down the bottom section.

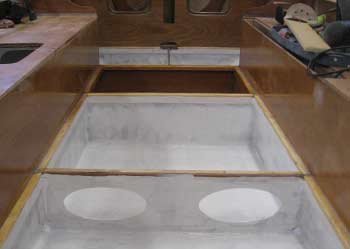
After spending an afternoon sanding and smoothing the inside of the floor compartments I put the first coat of paint on. Since I had a fresh coat of epoxy only a couple of days old I waited to paint the water ballast tank. The epoxy likes to have a few days before a finish is applied. Besides I have a half can of polyurethane boat paint that will work well in the compartment. It's much nicer paint than the paint I'm using for the other lockers.
Once the paint has dried I will be able to glue on the floor. Read about installing the sole and sole liner.
emails: Christine
If you decide to build a boat be careful. These tools can be dangerous. If you don't know how to safely handle something find out. There are lots of forums out there.
This web site reflects my personal ideas and doesn't represent anyone else's point of view. I don't claim to be an expert in anything, just someone muddling along.
I pay for maintaining this website by having links to Amazon.com. I choose the ads to be relevant to the content. Mostly stuff that I buy myself or lust after. If you buy after clicking one of the links I get a small fee.
I live in a mostly rural area and suppliers of boatbuilding stuff are pretty thin on the ground. Amazon has proved to be a reliable and well priced resource.
SCAMP envy/Lust This is a thread in the Wooden Boat Forum.DEWALT DW3742C 14-Piece T-Shank Jig Saw Blade Set with Case

Hawkey Goly Mens Sport Analog Watch Genuine Leather Chronograph Quartz Watch with Date Window Waterproof

Gyokucho 770-3600 Razor Ryoba Saw with Blade


LifeStraw Personal Water Filter for Hiking, Camping, Travel, and Emergency Preparedness

Stanley Classic Vacuum Bottle 1.1QT Hammertone Green
Bessey LM2.004 LM General Purpose Clamp

Garboard Drain and Plug from Sea Dog

I often buy books just for the fun of reading and dreaming about my next boat build. Building the Greenland Kayak : A Manual for Its Contruction and Use

Devlin's Boatbuilding: How to Build Any Boat the Stitch-and-Glue Way

Building Classic Small Craft : Complete Plans and Instructions for 47 Boats

SeaSense Galvanized Claw Anchor, 22-Pound

Varnish,Spar,Oil Satin,Qt

This website is written and maintained by me. I use Amazon ads, chosen by me not a machine, to reflect the requirement of the build, and to pay for the website now that I am retired. If you decide to build a boat be careful. Some of the tools and materials can hurt you. I offer this page for entertainment and don't want to imply that my method or ideas are necessarily the best way to do things. It just worked for me.