

Steps in Building a SCAMP sailboat
Links to all my scamp building pages.
Link to Part 2 of Rigging
Rigging a SCAMP Sailboat part1
Part 1, Sail, Reefing, Downhaul, Outhaul
WARNING: The following article is a description of how I rigged my SCAMP. There is only incomplete information on the details of SCAMP rigging on the INTERNET and in the manual, and what I am presenting here is what I did. I'm not an expert. I've had my boat out a few times now and I have not found any great problem with the set up I'm using. I'm sure there are lots of improvements possible, but, this is working and seems to be safe. Take it as a place to start and improve what you find lacking. There are many right ways of rigging your SCAMP so be prepared for many arguments. This is offered as a good place to start. Maybe, just maybe, it's perfect and can't be improved on. (I wish!)
As I re-read this page I can see that it is confusing. It's a work in progress and I'll improve on it. I've been sick and have not had a lot of energy to improve my website.
There are many separate 'Systems' that add up to the completed rigging.
It's useful to think of the RIGGING as a collection of separate sub units. They affect each other of course but mostly function independently. This lists them in no particular order. I've included some topics that are not strictly rigging such as cleats, row locks and Safety. I'll include them in part 2.
- Sail
- Positioning and Attaching the sail to the Boom and Yard
- Outhaul
- Deck Fittings for Halyard and Downhaul
- Halyard
- Downhaul
- Reefing
- Lazy Jacks
- Rudder
- Centre Board
- Cleats and Row Locks
- Safety
Setting up the SAIL
The balanced lug sail, is four sided. that is attached to the boom fore and aft, and laced onto the yard. The yard is then attached to the halyard which raises it to the top of the mast, and the boom is attached to the downhaul which is attached to the cuddy roof at the bottom.
The downhaul is very important. It allows the sail to be tightened so that the leading edge, the part of the sail at the front, can be tightened to maintain proper shape of the sail.
Lacing the sail on
You need a bit of space to do this. Find yourself a nice lawn, or clean gym, or large living room. Lay your yard and boom down and spread out your sail in between.
Your yard will be thicker at one end than at the other. The thinner side goes towards the higher point of the sail, the PEAK in official sail talk. If your yard is much longer than your sail don't allow too much material at the lower end otherwise it will rub against the boom when you reef to the smallest area of sail.
You will need some line to lace your sail. Paracord works, or any reasonable line 3/16 - 1/4 inch. My sail came with a goodly supply.
Go ahead and tie your line to the throat grommet (the upper corner opposite the peak) and to the yard, this could be a few inches from the end. Link your knot to the hole you made in the yard so the sail doesn't slide along the yard.
I used a bowline on the grommet then used clove hitches and half hitches to attach the sail. You should now have one corner of the sail attached to the yard and to the hole. You can now lace the sail so that there is not a large gap between sail and yard but it is not pulled too tight.


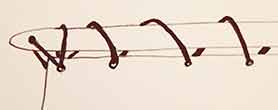
In reality, the knots will likely look a bit messier than the diagrams but don't fret about that. When you reach the peak, tie your sail to the yard and through the hole on the yard. At this point the top of the sail should be secure to the yard and not able to slide one way or another. Leave yourself a bit of extra line so that if you decide to change your knots or lacing you have enough line. Once you are sure, then cut the lines and finish them either by melting or by binding the end.
There are a great many ways of lacing a sail onto spars. Mr. Google can come up with quite a list. There are arguments raging about the benefits of various variations. Don't fret, the simple lacing works very well. Below is my yard lacing. I did a slightly more attractive, to my eyes, lacing. There is quite a lot of extra length of my yard. I left as much as I could on the lower end to avoid putting more weight up high but the lower end was rubbing against the boom when the sail was reefed so I had to adjust. I also adjusted the slight fold you can see in the sail.
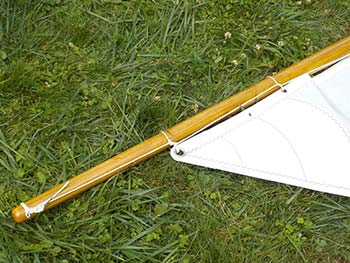
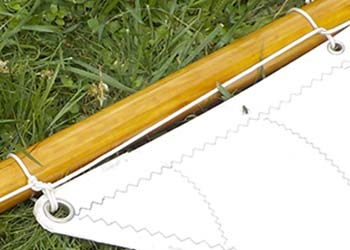
The boom is much simpler, the sail is not laced but only tied to the ends, the clew (under the peak above) and the tack. For the time being center the sail on the boom. If it needs to shift it's not hard to do as required.
The clew in the lower forward corner should be tied securely to the hole you have made in your boom using a strong piece of line. I used the same line I used to lace the sail but doubled it up. The tack is kept temporarily loose because it will be connected to an outhaul. The outhaul tensions the bottom of the sail and can be loosened or tightened as required to make the sail more or less flat. Until you have set up the outhaul, just tie the line to the boom through the back hole.
The sail is now attached to the yard on top and the boom below. You still have to sort out the outhaul.
Note that my holes on the ends of the boom are close to the ends. I should have left a bit more space between the end and the hole but because I misread the plans I ended up with a short boom that had to be re done. Because of Covid I had trouble getting suitable material so I used material I had, which ended up just a bit short. Hopefully your boom is longer than mine by a few inches.
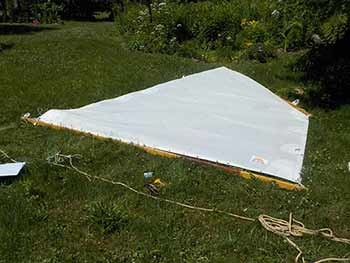
At this stage you should have a sail, laced on to the yard with the thinner end of the yard at the peak of the sail, and tied to the boom permanently at the fore end and temporarily at the aft end, waiting to have the outhaul installed.
I found it useful to label FORE AND AFT temporarily with tape. Saves having to figure it out every time.
Setting up the OUTHAUL
The purpose of the outhaul is to tighten or loosen the foot of the sail. It has to be convenient and easy. There are any number of ways this can be set up.
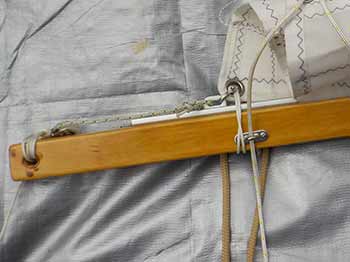

My outhaul consists of a short aluminium track screwed onto the top of the boom. There is a plastic slider that fits in the track. It is attached on the right to the corner of the sail,using a small shackle, and to the left on a line that goes to a small block lashed to the boom.
Disregard the fairlead and line in the first photo, this is part of the reefing system we will see later.
The block turns and guides the line around to a fairlead and a cam cleat bolted to the far side of the boom about 3-4 feet from the end so that the cam cleat would be at a convenient spot to reach in the cockpit. I have cut the ends of the bolts and sanded everything so it is smooth and does not catch or scratch.
I have a stop knot on the end of the outhaul line so it stays in the fairlead. The knot also makes it easier to pull the line. The line is 3/16 and is very strong. I bought 3 short length of a spectra blend, 2 for the rudder and one for the outhaul.
There is a stop at the end of the track to prevent the plastic slider from getting out of the track at the front.
The corner of the sail is loosely tied to the boom around the aluminium track. I'm not sure that is necessary but I wanted something to hold the sail in case the outhaul exploded. Or more likely, the plastic slider broke.
I bought the track from Duckworks but in hindsight it is overkill for my use. The corner of the sail could easily be tied to the line that goes to the block, bypassing the track. Looks boaty and high tech though!!
Some people add another block and gain some mechanical advantage so they don't have to pull hard. I will try it as it is and improve if necessary.
NOTE: After a few sails, the outhaul seems to work fine so I don't think I will change it.
Ok so now the outhaul is set up. In short, the sail is shackled to the plastic slider in the aluminium track. This slider is then tied to a strong line that goes through a small block lashed to the end of the boom and returns to a fairlead and a cleat on the reverse side of the boom.
You now have your sail attached to the spars with an outhaul nicely cleated tensioning the base of your sail.
Deck fittings for HALYARD AND DOWNHAUL
You now need to install some hardware onto the roof so you can attach the boom to the roof of the cuddy. The deck fittings for the halyard on one side and the downhaul on the other side of the mast are similar. A block near the mast to turn the direction of pull and cleats on the edge of the cuddy roof.
The halyard I put on starboard and the downhaul on the port side. There might be a traditional side for each but I did not worry about that.
When I made the roof of the cuddy I fitted a support across the edge of the roof. I had not yet figured out how I would use it but I knew there would be some lines to cleat and I wanted a slightly higher spot. I had also prepared some half inch plywood pieces to back the blocks near the mast.
The blocks on each side of the mast are simple to install, in theory, but in practice it was tricky to align the holes so that they would fit around the bulkhead and the mast step support. Everything is held together with stainless bolts, washers, and nuts. I used 3M 4200 so called "somewhat re-positionable" adhesive/sealant. In actual use it makes a very good adhesive.
The downhaul gets a sturdy cam cleat mounted on the edge support, while the halyard gets the same kind of cleat I used on the edges of the boat to attach the mooring lines.
Both of these cleats are bolted on the support on the edge of the cuddy.
After installing everything I realized that I had forgotten to insert the block in the base so I had to use a little shackle to connect the block to the metal based bolted to the roof.
I allowed the deck fittings to set before setting up the parts that connect to the sail and mast. The sealant/glue takes a day to set through and I didn't want to chance breaking the seal.
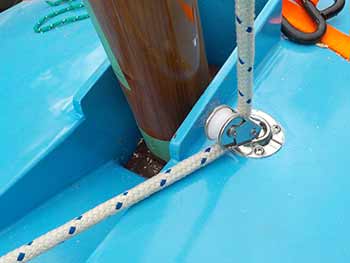
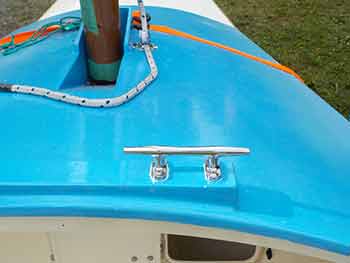
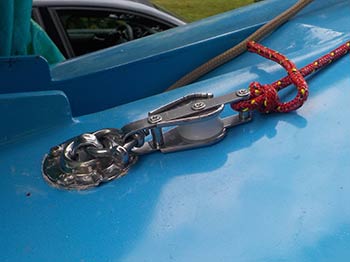
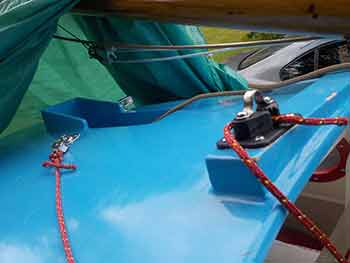

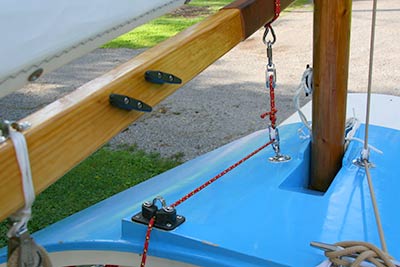
Now the deck hardware is installed for the halyard and the downhaul, deck blocks to turn the direction of the lines towards the back, and sturdy cleats.
Once I'm satisfied that the position of the hardware is working I will cut and sand the protruding bolts. It was difficult to get the right size hardware because of shipping difficulties and erratic stocks so I used longer bolts than needed.
Halyard and Downhaul can now be set up.
The last photo shows a test I did of the downhaul and halyard. I found that there is not much room to tighten the downhaul partly because My mast is a couple of inches shorter than designed. I can modify the setup and get a couple of more inches and this will work well. I was a bit doubtful of the big cleat for the halyard but I found that it works very well.
Setting up the HALYARD
The halyard attaches to the yard, goes up to a block at the top of the mast, then comes back down along the mast to the deck block alongside the mast, changes direction and goes on to the cleat at the edge of the cuddy roof.
When you pull on the line, the sail goes up. It's was a real thrill the first time I saw the sail go up.
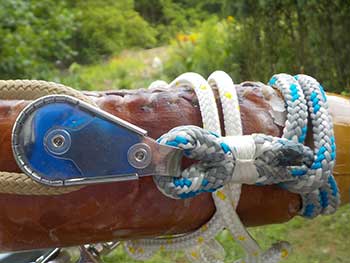


I made 3 loops. One to attach a block at the top of the mast, one to connect the halyard to the yard, and a third to connect the downhaul to the boom. The boom and the yard loops have thimbles, it makes it sturdier to attach shackles. I did not put any on the one that connects the block because I had trouble getting them (covid and all.). Round thimbles would probably been better and shorter but this is what I could get. The loops just go around the spars and can easily be moved to adjust position. The top one, which attaches the block for the halyard, goes through the hole at the top of the mast. I knotted and secured the connections. I'll keep an eye on them as times goes on just to make sure they are not fraying or coming apart.
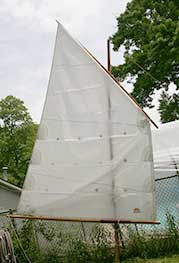
I fretted and worried about positioning the sail. This determines the position, fore or aft, of the sail and thus the balance of the rig. Ideally, which does not exist, the centre of effort is balanced against the center of resistance of the centerboard, hull, rudder, and I guess the skegs.
I placed the top connection about 2/5 of distance to the leading edge at the front. That is I divided the top of the sail in 5 and put my loop at the 2/5 spot. The photo is deceptive because of slight rotation and loose lines.
I placed the bottom connection so that the edge of the sail is the same distance from the mast top to bottom. This is not a requirement, just a place to start.
I sat in the grass with the mast in position and figure this out in the flat. (My boat was still in the winter shelter and I could not raise the sail properly, so after positioning the loops I tied the mast against a fence and raise the sail there.)
I've now been out 3 times in low wind and the sail position appears to be in the ball park. In the few stronger gusts, the boat kept going straight without needing correcting with the rudder. I'll adjust the position, forward or back when necessary.
So now, there is a loop supporting a block, attached to the mast at the top. This goes through the hole at the top of the mast. Because the sail rotates around the mast as the tack changes there needs to be about 6-8 inches of space between the yard and the hole in the mast. This allows the sail to move around.

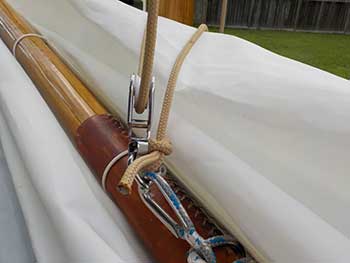
OK, time to hoist the sail. You have a halyard, with one end tied to the cleat on the edge of the cuddy so it doesn't take off on you, and come out of the block at the top. This halyard goes through the deck block, goes up to the top of the mast through the block, then comes down. Hang on to this and don't let it get away to the top because you will have to lower the mast to re-thread it back through the block. Ask me how I know!! You are now hanging on to the end of the halyard.
Put this end through a swivel block and pull out about 18 or so inches. Make a knot at the 18 inch mark.
Tie another knot at the end on the curved part of a shackle. If you look at the picture I have, the line comes down through the swivel block, there is a knot, then there is another knot, DISREGARD THIS SECOND KNOT, I was just figuring out what to do and forgot to take it out before taking a photo.
I put a block with a swivel, but I don't think it is necessary. There exists fittings that are essentially 2 loops with a swivel in between, that would work just as well I think. Again I was hampered by the lack of access to fittings.
Now, you can take the shackle and fasten it through the thimble on the loop attached to the top spar, the yard, and through the end of the swivel end of the block. Close it tightly and you are ready to hoist the sail. Pull it up and cleat it.
Once the sail is up, you will see it will swing forward and the sail will be loose at the bottom, you need a downhaul.
This set up works but I think the lower block is not necessary and I could take it out entirely and only use the shackle directly in it's place. To be continued...
The line is 3/8 polyester.
SCAMP DOWNHAUL
The purpose of the downhaul is to pull down on the sail and tension the leading edge. Unlike other sails, the edge of the balanced lug sail is not set against the mast so it is free to flex unless pulled tight. In order to set properly, the edge must be under tension so it can shape properly.
The downhaul also positions the sail more or less forward or back depending on where you have located your loop. Your hardware should be in place already. That is, you have installed a deck swivel block that has a becket, you have a loop with a thimble hanging downwards, on the boom, you have a simgle block and a shackle ready.

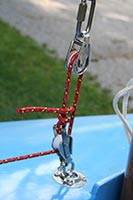
Attach your single block to the the loop using the shackle. I'm using a stainless steel chain link instead of a shackle and I think it is working very well. It is easy to hang the link on both parts and it holds in place while the little captive nut is screwed on. You can see it at the very top of the detailed photo.
Tie your line to the deck block becket using a bowline knot. Pass the line through the single block and back down through the deck block and cleat it to the cam cleat you installed earlier.
You can now tighten the downhaul and it will pull the boom and sail down. The set up gives you a 2:1 mechanical advantage.
I expect I will eventually change the loop I have made with a round thimble instead of an oval one, and will get a shorter chain linker or shackle. This will enable me to pull the boom lower if necessary.
REEFING LINES
Reefing lines allow you to reduce sail easily while standing in the middle of the boat. No reaching and trying to balance holding on to a flopping sail. The down side of reefing lines is that there are yet another bunch of lines to get tangled.
They are simple to add and provide a lot of ease of mind.
If you look at your sail you will notice reef points along the fore and aft edges of the sail. Usually there are 3 but you might have only 2. I chose to only set up the smallest and largest reefing points. If I want to use the middle one I'll reef to the maximum and set up the other lines by hand then I can shake out the maximum reef. I did not set up the third reef because I felt the boom was getting a bit crowded and the chance of tangling was increasing.
These are simple to set up. You will need either smooth pad eyes, or fairleeds, some small cleats and 1/4 inch line. You will also need nuts and bolts to fasten through the boom. Choose 2 different colour lines otherwise you will get confused when reefing.
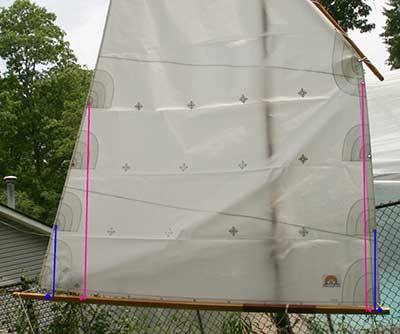
NOTE Don't leave too much yard or boom towards the front because when you reef the sail the spars might bump against each other, If you look at the photo you can see the yard protrudes beyond the sail and the boom rubbed against it. I had to move the sail further towards the right to fix this.
Lay out your sail in a nice patch of shade, or better raise your sail on the mast. Put a loose line in the reefing point you are setting up and mark where it falls on the boom. Mark the point then go back an inch or so. You want your reefing lines to be just a little bit wider than the width of the sail at the level of the holes so that when your reef is in the sail is not bunching up on the boom but rather are slightly under tension. You will not have the outhaul for the reefs. The fore of the sail is almost perpendicular so the points will be almost the same for each of the reefing points but the aft of the sail has more of a diagonal and the marks will be further apart. If you are on the grass make your best guess, it's not critical.

Position a pad eye or a fairleed in the 2 fore and aft spots you have chosen. Drill right through the side of the boom and install one on each side using nuts and bolts. Use the same bolt to fasten the pad eye on both sides. You will now have 8 pad eyes or fairleads, 4 aft and 4 fore. You can see 2 on the photo and if you look on the other side of the boom, there are 2 exactly the same bolted with the same nuts and bolts. Once you are happy with the positioning you can cut and sand the extra length of bolt.
Install one set fore and one set aft slightly higher so they don't interfere with each other's line, you can see that the one closer to the end is lower.
Some people install a pad eye on the back and a small block on the front.
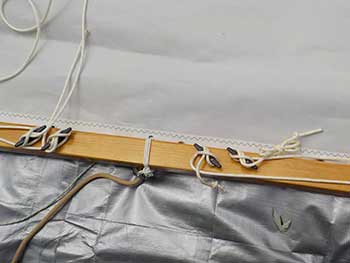
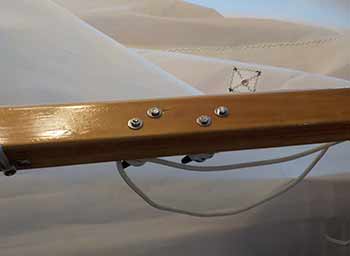
You now need to bolt 4 small cleats towards the centre of the boom to tie off your reefing lines. I used black nylon cleats large enough to handle the 1/4 inch line.
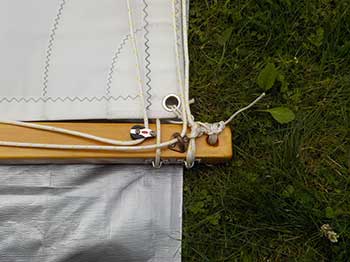
I wanted to use 2 nice cheek blocks that I had for the fore reefing setup but between the grass spot and my shop I lost one and could not find it even with the metal detector. So I used one and an extra pad eye I had from another boat build. There are pad eyes in the back same as on the other side.
To set up the reefing, tie a line to the back pad eye. Thread the line towards the front through the grommet in the sail at the level you want to reef, then down through the front pad eye. Don't tie the line in the front. Instead, run the line to one of the plastic cleats and tie it off. Make a knot about 8 inches away from the cleat. Any extra line can be cut and melted, when you have checked that the reef works to your satisfaction.
Do this fore and aft for the 2 or 3 reefs you are setting up.
To reef, lower the sail the amount you will be shortening the sail, then uncleat the reef line you want on one side, and simply pull on it.
The line will tighten and start pulling the boom upwards towards the reef. When the boom and the reef grommet are near each other cleat your reef line and do the same to the other end of the sail.
Tighten the downhaul till the sail is deployed. You might have to loosen or tighten the halyard.
Your sail will have little holes along the middle between the reefing points. You can put short lines through these grommets and use them to tie up the middle section of the sail along the boom. Tie only the sail, not the sail with the boom.
It's not essential to have reefing ties but it makes things tidier looking.
Part 2 of this page which describes the Lazy jacks, Mainsheet and traveler and centreboard set up.

Steps in Building a SCAMP sailboat
Links to all my scamp building pages.
emails: Christine
If you decide to build a boat be careful. These tools can be dangerous. If you don't know how to safely handle something find out.
This web site reflects my personal ideas and doesn't represent anyone else's point of view. I don't claim to be an expert in anything, just someone muddling along.
I pay for maintaining this website by having links to Amazon.com. I choose the ads to be relevant to the content. Mostly stuff that I buy myself or lust after. If you buy after clicking one of the links I get a small fee.
Carbide blade scraper is one of the most useful finishing tool I own.

Warner 804 Tool 2-Inch Carbide 100X Scraper with Knob by Warner Manufacturing
I used Brightside Polyurethane to finish my SCAMP and other products. I can recommend it. A bit pricey if you only look at the can price but it covers really well and is strong.
I used a great number of these pad eyes both in the rigging and inside the boat as attachment points. Use nuts and bolts not screws though. They come in 2 sizes.
I used a great deal of 1/4 inch nylon for my boats. This is what I used to lace the sail. 500 feet is a lot of rope (there is also a 250 feet pack) but I also use it to tie my boat covers, and as regular utility line in the boat. Buying it in bulk has been the most economical way of getting it.
Stainless Steel Cleats. I used 4 on the sides of the SCAMP and one on top of the cuddy to tie up the halyard.
I used quite a lot of 6mm polyester rope in rigging. I used it in lazyjacks, and in the reefing lines. Get different colours for each applications.
Oscillating multi tool is also very useful for sanding in corners and in hard to reach areas.

I used several Racelite cam cleats.
Small Blocks
Rockwell RK5151K 4.2 Amp Sonicrafter F80 Oscillating Multi-Tool with Duotech Oscillation Angle Technology. 12 Piece Kit includes 10 Accessories, Carrying Bag, and Oscillating Tool

Fandeli 36014 220 Grit Wood Sandpaper Sheets, 9" x 11", 25-Sheet
Inexpensive rounding bit kit gets you started.

Yakamoz 6Pcs 1/2 Inch Shank Round-Over Router Bits Corner Rounding Edge-forming Roundover Beading Router Bit Set
Freud rounding bits.

Freud 5 Piece Round Over/Beading Bit Set (1/2" Shank) (89-152)

LifeStraw Personal Water Filter for Hiking, Camping, Travel, and Emergency Preparedness

Stanley Classic Vacuum Bottle 1.1QT Hammertone Green